
Most “won’t turn on” problems come from four easy-to-check controls: thermostat settings or batteries, a tripped breaker or blown fuse, a clogged air filter, or a condensate safety switch. Start at the thermostat (cool mode, setpoint below room temperature, fresh batteries), then check the breaker. If you smell burning, hear buzzing or sizzling, or the breaker keeps tripping, stop and call a professional.
TL;DR:
- Set the thermostat to cool below room temperature, replace batteries if the screen is blank, reset a tripped breaker once, then wait five minutes and retest.
- If the breaker trips again, or you notice burning, smoke, sparks, buzzing, or sizzling, shut the system off and call a qualified technician.
- With power off, clear a clogged drain using a wet and dry vacuum at the outdoor exit; standing water can trigger a safety shutoff.
- Low refrigerant usually weakens cooling rather than preventing startup, so require technicians to find and repair leaks before refilling the system.
Table of Contents
- What to check first when your AC won’t start
- Match what you see to the likely cause
- Safe step-by-step troubleshooting, in order
- How to clean a clogged condensate drain line
- When to call a professional right away
- Preventive maintenance that keeps your AC starting
- How to read error codes on smart thermostats and control boards
- How to verify your AC is actually receiving power
- How to safely inspect the outdoor unit’s fan and compressor
- Heat pump versus traditional AC: startup differences
- What the contactor does and how to inspect it
- A note from Wally on documenting a no-start call
- Let us diagnose it for you
- FAQ
- Sources
What to check first when your AC won’t start
Run these checks in order. Most are quick checks, and none require opening a panel or touching wiring.
- Thermostat: Confirm it is set to “cool” and the setpoint sits below the room temperature. If the display is blank, replace the batteries. Manufacturer troubleshooting lists these as the first steps.
- Breaker panel: Find the AC breaker. If it is tripped, switch it fully off, wait about five minutes, then switch it back on.
- Outdoor disconnect: Make sure the disconnect box near the outdoor unit is switched on.
- Outdoor debris: Clear leaves, grass clippings and loose items so the fan has room to spin.
- Air filter: Pull it out and look at it. If you cannot see light through it, replace it.
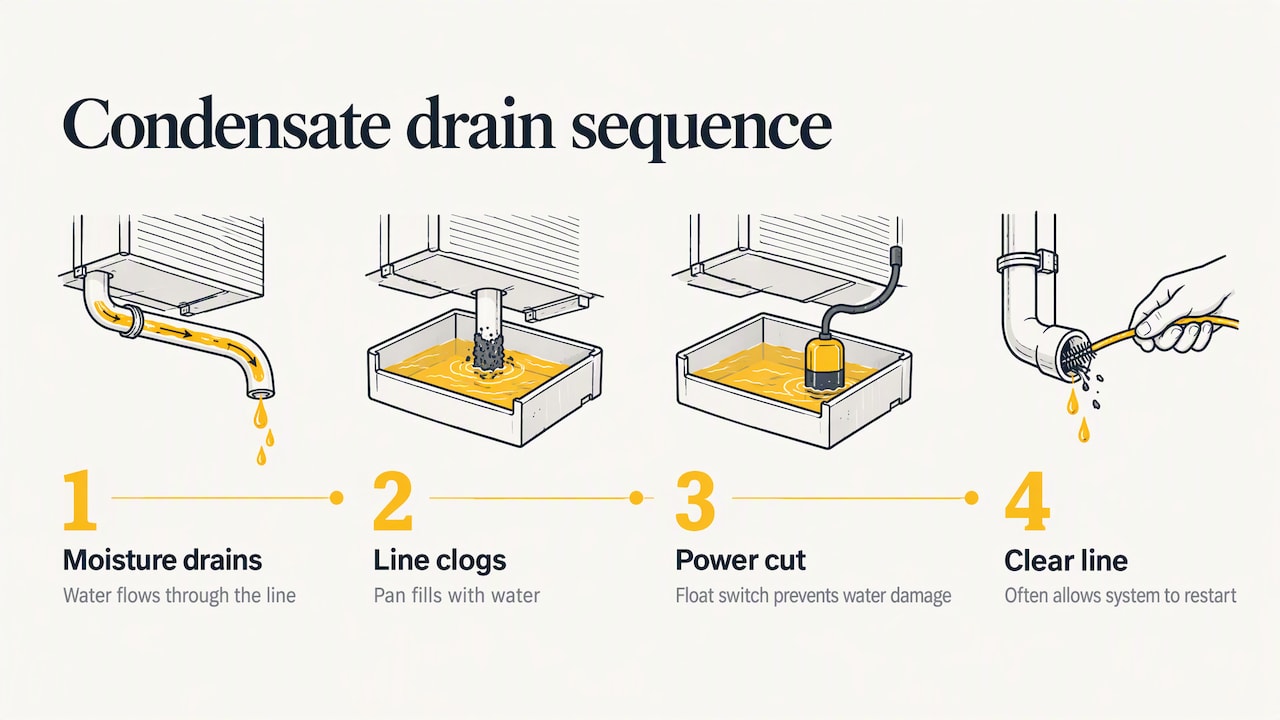
- Condensate pan and drain: Look near the indoor air handler for standing water or a wet pan. A full pan can trip a float switch and shut the system off.
- Vents: Confirm supply vents and returns are open and not blocked by furniture or rugs.
- Powers on but won’t run: If the unit shows signs of life but never starts cooling, stop there. That pattern points to a capacitor, contactor or power supply problem that needs a technician.
Pro Tip: Wait about three minutes after any power reset before judging the result. Manufacturer troubleshooting guidance lists a protective restart delay for many systems.
Match what you see to the likely cause
The symptom tells you where to look. A completely dead system, a unit that hums but never cools, a wet floor near the air handler and a clicking sound each point somewhere different.
Breaker and circuit problems
A tripped breaker or blown fuse is one of the most common reasons an AC goes silent. If the breaker flips again right after you reset it, that is not a nuisance. Repeated trips are a fire-safety warning, and air conditioners are meant to run on dedicated circuits. Extension cords are a hazard for high-draw appliances like this.
Electrical safety groups also flag sizzling or buzzing sounds and flickering lights as signs to call a qualified electrician right away. Treat those the same way as a breaker that will not stay on.
Thermostat and control problems
A blank screen, the wrong mode, dead batteries or a loose control wire can all stop the system from getting its start signal. The air handler and outdoor unit may be perfectly healthy and simply never told to run. If new batteries and the right mode do nothing, a failed thermostat or damaged low-voltage wiring is a likely suspect, and replacement is a quick job for a technician.
Airflow restrictions
A dirty filter and blocked vents choke airflow. In mild cases the system short cycles, turning on and off quickly. In worse cases, safety controls can keep it from running. Swapping a clogged filter is the cheapest fix in this whole article, and cleaning or replacing filters can lower an AC system’s energy use by 5–15% as a bonus.
Condensate drain and float switch
Your AC pulls moisture out of the air, and that water drains away through a line. When algae, dust or sludge clog the line, the pan fills. A float switch then cuts power to prevent water damage. You get a system that won’t start and a damp spot near the air handler. A full drain pan can trip that safety switch, and clearing the line often brings the system straight back.
Capacitor and contactor failures
These electrical parts give the compressor and fan motor their starting push. Typical symptoms are a click from the outdoor unit, a fan that does not spin, or an indoor blower that runs while the outdoor unit stays silent. When basic checks fail, failed capacitors or contactors may be the cause, and they require professional diagnosis. Capacitors can hold a charge even with power off, which is why this is not a driveway project.
Refrigerant and mechanical faults
Low refrigerant usually does not stop a system from starting. It causes weak cooling, ice on lines and extra strain on the compressor. If a technician finds low refrigerant, ask for leak detection. EPA guidance says technicians should locate and repair leaks rather than simply topping off the system. Topping off without a repair means repeated service calls and a compressor that works harder than it should.
Power supply mismatch
Some units get enough power for the controls but not enough for the compressor. An undersized or incorrectly rated power supply or a shared circuit can cause exactly that, so the unit powers on but never runs. This applies most often to window and portable units.
Safe step-by-step troubleshooting, in order
Follow these steps in sequence. Each one is a homeowner-safe check, and each one tells you when to stop.
- Confirm the thermostat. Set it to “cool” and drop the setpoint a few degrees below the room temperature. If the screen is blank or faint, replace the batteries. If the display looks normal but nothing happens, move on.
- Check the breaker. Open the panel door only; do not remove any inner cover. If the AC breaker sits in the middle or “off” position, switch it fully off, wait five minutes, then switch it on. If it trips again, stop. Do not keep resetting it.
- Look at the outdoor unit. Make sure the disconnect is on and nothing is piled against the cabinet. Only when power is off at the disconnect and the breaker should you reach in to clear debris. Never open the access panel or touch wiring.
- Swap the air filter and check vents. Replace a dirty filter with the correct size and open any closed or blocked vents.
- Check the condensate drain. Turn power off first. Look at the pan for standing water. If you find it, follow the drain-line steps in the next section.
- Wait and retest. Restore power, wait a few minutes for the restart delay and try the thermostat again.
Stop conditions: a burning smell, smoke, sparks, repeated breaker trips, constant buzzing or sizzling, or a visible refrigerant leak. Turn the system off and call a technician.
Pro Tip: Multimeters belong with experienced users only. If you have never tested a live circuit, skip it. Live electrical testing can be dangerous, so leave it to a qualified technician.
How to clean a clogged condensate drain line
A clogged drain line is the one fix many homeowners can handle safely, and it often solves a “won’t turn on” call outright.
- Know the signs: standing water in the pan, a musty odor, or water on the floor or under the unit. Carrier’s drain-line guide lists these same signals.
- Cut the power first: switch the system off at the thermostat and at the breaker or disconnect before touching anything.
- Use suction first: find the drain exit outside, usually a PVC pipe near the outdoor unit or along the foundation. Hold a wet/dry vacuum to the end and pull the clog out. This is the recommended method rather than reaching for chemicals.
- Try a vinegar flush if needed: locate the indoor access point, a capped vertical pipe near the air handler. Pour about a cup of vinegar in there, never in the outdoor exit. Avoid harsh chemicals that can damage drain components.
- Call us when it is out of reach: if suction and vinegar fail, or the pan sits in an attic or ceiling where a spill means water damage, stop and call. Our condensate drain clearing has current pricing on our website.
When to call a professional right away
Some situations are not worth a DIY attempt. Call a technician immediately if you notice a burning smell, smoke or sparks, a breaker that trips again after reset, constant buzzing or sizzling, a visible refrigerant leak, or a compressor that still does not start after the basic checks. Manufacturer guidance backs this list. Systems over 10 years old that fail often deserve an evaluation too, since replacement can cost less than repeated repairs.
A professional visit covers what you cannot safely do yourself: electrical testing, capacitor and contactor checks, refrigerant leak detection and repair, deep drain clearing, and parts replacement. Technicians handling refrigerant need Section 608 certification, and intentionally venting refrigerant is illegal.
Before you book anyone, ask for NATE certification, proof of Section 608 for refrigerant work, a written diagnosis and clear pricing. If your AC dies on a hot day and cannot wait, our guide to emergency AC repair covers what to do in the meantime.
Preventive maintenance that keeps your AC starting
Most no-start calls trace back to something small that built up over months. A little routine work prevents them.
- Annual tune-up each spring: seasonal service typically checks thermostat settings, tightens electrical connections, measures voltage and current on motors and confirms the system starts and shuts off properly. Our guide to signs you need a tune-up shows what to watch for between visits.
- Filter changes on a schedule: check monthly during heavy use and replace when dirty, since a clean filter keeps airflow healthy.
- Drain-line checks: look at the pan and flush the line a couple of times a season to avoid float-switch shutdowns.
- Coil and cabinet care: keep the outdoor unit clear of plants and debris, and have coils cleaned during service.
- Leak detection over top-offs: if cooling weakens, insist on finding the leak instead of adding refrigerant.
Annual maintenance can prolong the life of your equipment and improve comfort. If you would rather not track all of this yourself, our HVAC maintenance plans put seasonal checkups on the calendar so small problems get caught before a hot weekend.
How to read error codes on smart thermostats and control boards
Smart thermostats and modern control boards often tell you exactly why the system will not start, if you know where to look. On a thermostat, check the screen for a message, a blinking icon or a numbered alert. Many models also have a diagnostics or system status page in the settings menu.
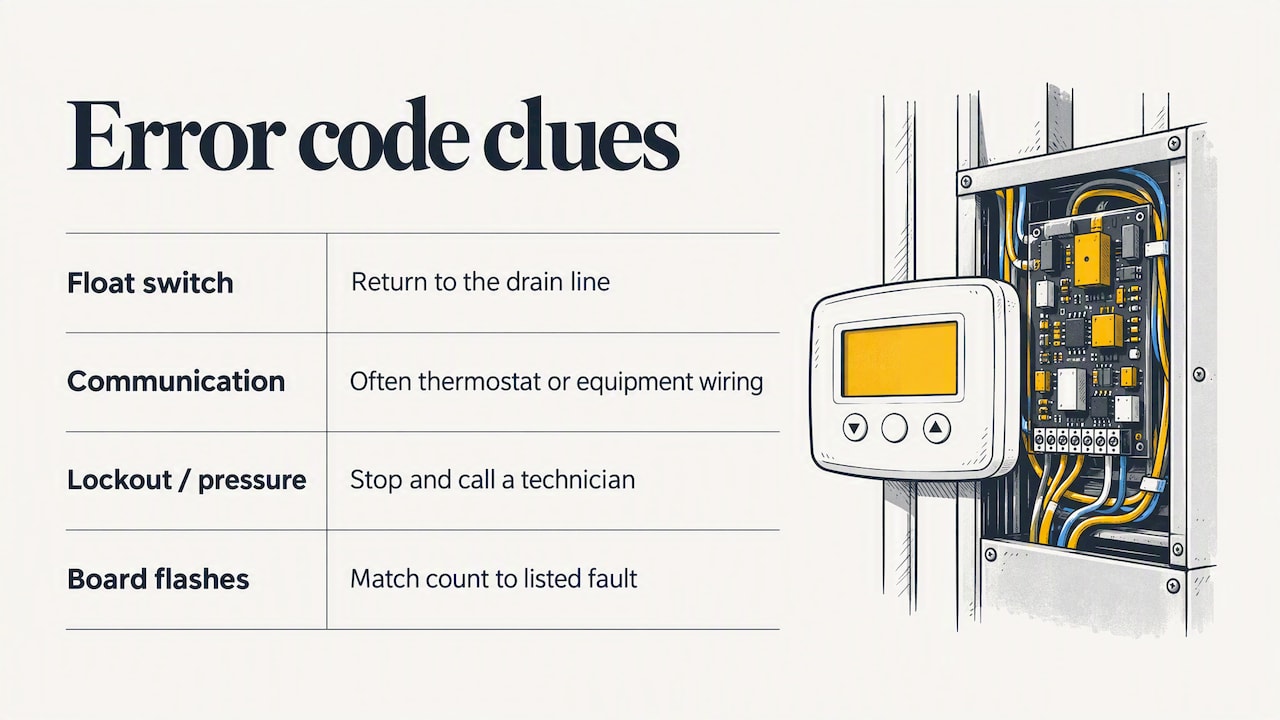
On the equipment itself, most modern air handlers and outdoor units have a small window or LED on the control board. A steady light usually means normal operation. A blinking pattern is a code, and the number of flashes maps to a fault listed on a label inside the access door or in the owner’s manual. You can read that light through the viewing window without removing anything.
Codes vary by brand, so use your manufacturer’s chart rather than a generic list. Common categories include a float switch fault, a low-voltage or power problem, a communication error between thermostat and equipment, and a pressure or safety lockout. Write the code down exactly, along with what the system was doing when it appeared.
A float switch code sends you back to the drain line. A communication error often points to the thermostat or its wiring. A lockout or pressure code means stop and call. Handing the technician an exact code usually shortens the diagnosis.
How to verify your AC is actually receiving power
Before blaming a part, confirm that power reaches the unit. For window and portable units, this is simple. Make sure the plug is fully seated, then test the outlet with a lamp or an outlet tester. Manufacturer help pages also suggest checking for a reset button on the power cord and a blown time-delay fuse.
For central systems, start with what you can see without tools. Is the breaker on? Is the outdoor disconnect on? Does the indoor air handler show any light, sound or display? If the indoor unit has life but the outdoor unit does not, the problem sits in the outdoor circuit, the contactor or the thermostat signal.
A multimeter can confirm voltage at the disconnect, but this is for people with real electrical training. Central AC runs on 240 volts, and live testing near the unit carries a serious shock risk. If you are not trained, skip the meter and tell a technician what you found: which parts have power and which do not. That narrows the problem fast. Sizzling, buzzing or a burning smell anywhere along the way means shut it off and call.
How to safely inspect the outdoor unit’s fan and compressor
Treat the outdoor unit as a look-only inspection unless the power is fully off.
With power on, from a distance: stand back and watch. Does the fan spin when the thermostat calls for cooling? Do you hear a steady hum, a click, a buzz or nothing? Is the compressor, the heavy dome-shaped component inside, running? A fan that spins but a compressor that stays quiet suggests a start-component problem. A hum with no fan movement often means the same thing. Do not poke anything.
With power off at the thermostat, breaker and disconnect: look for bent fan blades, a cracked motor mount, rodent damage, oily residue near fittings and loose or frayed wires visible from outside. Clear leaves and grass from the fins. Do not remove the access panel, touch wires or spin the fan by hand to “restart” it while any power is live.
Oil spots near the refrigerant lines can signal a leak, and ice on the lines signals airflow or refrigerant trouble. Both are call-a-pro findings. Photograph anything unusual before you call.
Heat pump versus traditional AC: startup differences
A traditional air conditioner only cools. A heat pump cools in summer and heats in winter by reversing the refrigerant flow. That reversing step is the main startup difference, and it explains some behavior that worries people.
A heat pump may pause or make a whooshing sound when it switches modes. In heating weather, the outdoor unit periodically enters a defrost cycle: the fan stops, steam may rise from the cabinet and the system can briefly seem off. That is normal and typically lasts several minutes.
Heat pumps also depend on a thermostat set to the right mode: “cool” for summer, “heat” for winter, and not “emergency heat” unless needed. If your thermostat is on the wrong setting, the system may run oddly or not start the way you expect. Heat pumps also have a reversing valve and extra control logic, so more faults can show up as an error code.
The basic troubleshooting steps here, thermostat, breaker, filter, drain line, apply to both types. If you are unsure which system you have, check the outdoor unit label or the manual.
What the contactor does and how to inspect it
The contactor is a small electrical switch in the outdoor unit. When your thermostat calls for cooling, it sends a low-voltage signal that pulls the contactor closed. That closes the high-voltage circuit and lets power flow to the compressor and condenser fan. No closed contactor means no startup, even if everything else is fine.
Contactors can wear out from repeated opening and closing. Contacts can become pitted or burned, the coil can fail, and insects or debris can jam the mechanism. Typical symptoms include a unit that hums or clicks without starting, or a fan and compressor that never kick on.
You can do a visual check from outside, power off. Look for a cabinet that is clean and dry, with no melted plastic, burn marks or insect nests. That is all a homeowner should do. Do not open the electrical panel, press the contactor by hand or try to bypass it. The line side of the contactor stays live at the disconnect, and capacitors nearby can hold a charge.
If you suspect the contactor, call for service. It is a quick, routine repair for a technician. Our capacitor and contactor repairs have current pricing on our website.
A note from Wally on documenting a no-start call
I have watched a lot of “my AC won’t turn on” calls end the same way: the homeowner did the sensible checks, and the technician fixed the rest quickly because the details were clear. Our team is NATE-certified, we answer emergency calls and we price transparently.
Before you call anyone, take a moment to document. Photograph the thermostat screen, the breaker position and any visible water or damage. Note any sounds you heard and when they happened, and whether the breaker tripped more than once. Write down the model number from the outdoor unit label. That record shortens the diagnosis and keeps repair costs down.
One more thing: schedule your tune-up before the heat arrives. Peak-season calendars fill up fast, and the system that fails in July is usually the one nobody looked at in April.
— Wally
Let us diagnose it for you
If you would rather have a NATE-certified technician take it from here, we can diagnose the problem and fix it. Our AC repair service starts with a Diagnostic Visit; current prices are on our website.

Here is what we commonly handle:
- Capacitor and contactor replacement
- Condensate drain clearing
- Refrigerant leak repair and recharge, always with leak detection first
- Thermostat replacement
- Blower motor replacement
- Compressor replacement
We offer emergency availability, transparent pricing and HVAC maintenance plans for seasonal checkups. When you call, have your system’s model number, a description of the symptoms and your breaker history ready. If you already took photos, even better. Reach us through our AC repair page and we will get a technician on the way.
FAQ
How do I make my AC kick on?
Set the thermostat to “cool” with the temperature a few degrees below the room reading, and replace the batteries if the display is blank. Then check the breaker, switching it fully off for about five minutes before turning it back on. Replace a dirty filter and wait a few minutes for the restart delay.
Why is my outside AC not turning on?
Common causes are a tripped breaker, an outdoor disconnect switched off, a thermostat not sending a start signal, or a failed capacitor or contactor. A full condensate pan can also shut the system down. If basic checks do not help, a technician should test the electrical components.
How do I force an AC to turn on?
You should not force it. Bypassing safety switches or jumping a contactor can damage the compressor and create a shock or fire risk. Work through the thermostat, breaker, filter and drain checks, and call a technician if the unit still will not start.
Can a clogged drain line stop my AC from turning on?
Yes. When the condensate line clogs, the pan fills and a float switch cuts power to prevent water damage. Clearing the line with a wet/dry vacuum at the outdoor exit often restores operation.